Flutter Clean Architecture implementation with Riverpod and Supabase
We recently published an article comparing Bloc & Riverpod. We see that this topic is very interesting but it does not have practical examples from the real world. Today I plan to continue this topic and talk a little about architecture.
So, after looking at several official and unofficial implementations, you may think that it is very flexible. But any flexibility in the wrong hands can lead to spaghetti code.
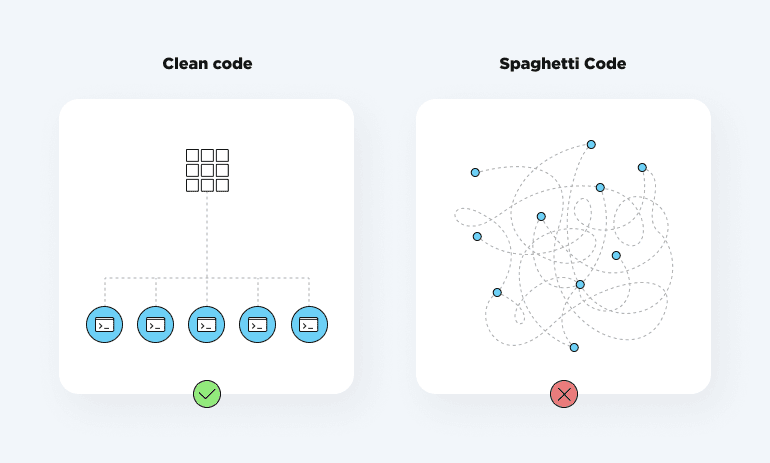
Here are things that are not suitable for me:
- passing the ref in the repository. Accordingly, there is a close connection between the layers
- merged configuration and implementation
- global provider functions created in the same controller files
These moments are not the best example for junior developers.
Discussing this with the team, we decided to implement the well-known clean architecture with Domain Driven Design and Riverpod. Looking ahead, you can change this package to any other without a deep refactor. We will not focus here on explaining the principles of Domain Driven Design, there are a lot of articles on the web.
For a complete picture, I will put one example here and describe it briefly.
Domain-Driven Design Layers
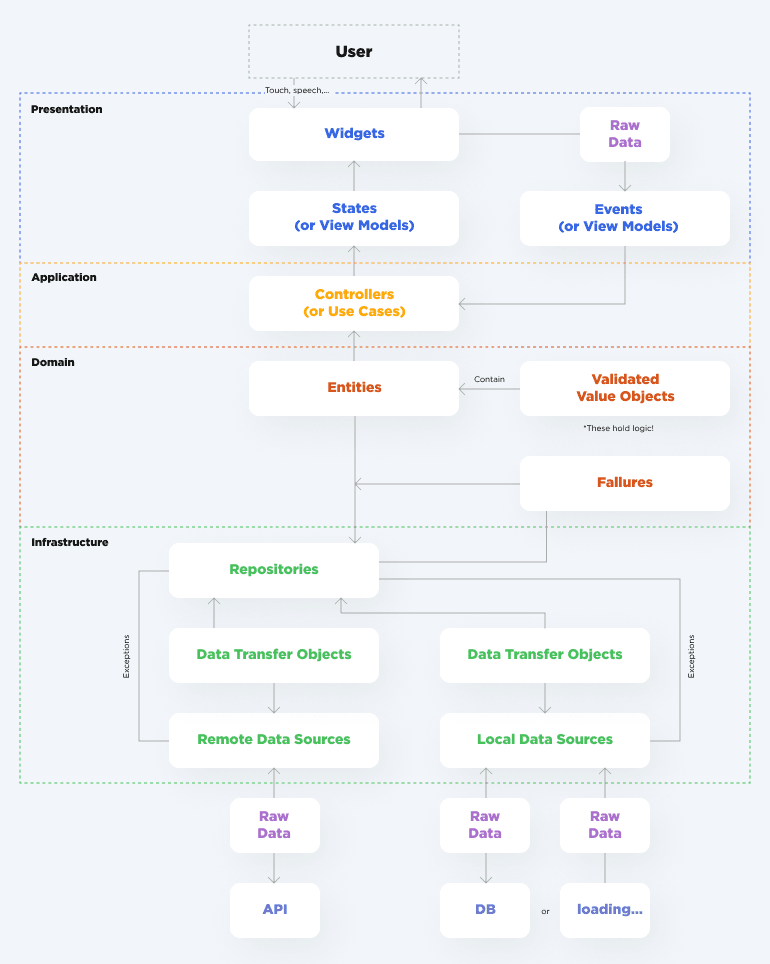
The scheme explains for itself, however, at the picture, we can see a few layers:
Presentation
It contains pages, widgets, and communication between them.
Application
This layer handles events from the Presentation layer and exposes states. Also, features use it to communicate with each other.
Domain
It keeps the main business logic. It contains abstractions, validators, and entities.
Infrastructure
This layer is responsible for communication with different data sources. It can be local services or remote. It contains repositories, Data Transfer Objects, and data providers.
Primary here are repositories. Depending on the backend, we can skip DTOs. For instance, if the app uses rest, we need DTOs to convert plain JSON into Entity. But if the app uses Firebase, it provides its own entities.
The question arises why we should do the double conversion. Because our feature should not depend on the data source. We describe in the domain how it should work and which entities we will use. Thus, when changing the data source, we only need to change the dependency in the repository. I will emphasize right away that we will not fully implement DI. That means we will skip some redundant interfaces.
Directory structure
There are two different implementations of the directory structure.
First one: All entities are grouped by purpose in the root directories.
Advantages: it is immediately clear what to look for.
Disadvantages: when the project grows - it is difficult to search.
lib/ ├── core/ │ ├── error/ │ ├── params/ │ ├── resources/ │ ├── routes/ │ ├── usecase/ │ │ └── usecase.dart │ ├── app_core.dart │ └── app_strings.dart ├── data/ │ ├── datasources │ │ ├── local/ │ │ └── remote/ │ ├── models/ │ └── repositories/ ├── domain/ │ ├── entities/ │ ├── repositories/ │ └── usecases/ └── presentation/ │ ├── blocs/ │ ├── pages/ │ └── widgets/
Second one: The so-called feature-based approach. Each feature has its own directory structure similar to the previous example.
Advantages: easy to search for related files.
Disadvantages: it is necessary to worry about the organization of relationships so that there are no duplicates of entities or implementation.
... ├── features/ │ ├── example/ │ │ ├── application/ │ │ ├── domain/ │ │ │ ├── entities/ │ │ │ └── failures/ │ │ ├── infrastructure/ │ │ │ ├── datasources/ │ │ │ │ ├── local/ │ │ │ │ └── remote/ │ │ │ └── repositories/ │ │ └── presentation/ │ │ ├── screens/ │ │ └── widgets/
We will use the second approach.
In this app, we use the following dependencies:
... dependencies: dotted_border: ^2.0.0+2 flutter: sdk: flutter flutter_localizations: sdk: flutter application. flutter_riverpod: ^2.0.0-dev.9 fpdart: ^0.2.0 freezed: ^2.1.0+1 go_router: ^4.1.1 intl: ^0.17.0 json_serializable: ^6.3.1 shared_preferences: ^2.0.15 supabase_flutter: ^0.3.3 uni_links: ^0.5.1 validators: ^3.0.0 dev_dependencies: flutter_test: sdk: flutter flutter_flavorizr: ^2.1.3 very_good_analysis: ^3.0.1 build_runner: ^2.2.0 mockito: ^5.2.0
In this example, we used Supabase as a backend service. This is a pretty good solution for a quick start. It allows us to save development time. But still, there are some problems: it does not support transactions, it is impossible to roll back migrations, and the server is not entirely compatible with npm. I will write about that in another article.
If you're not familiar with the Fpdart package, it's a sequel to the Dartz package. In the readme file, you can find links to good articles with examples that explain the philosophy of the library.
- freezed & json_serializable for fast generation of date classes
- go_router - navigator 2.0 implementation. Decent. Supports Deep Links, nested navigation, and parameters. Flutter team added it to the core packages. But there are moments, we are waiting for updates from the court team.
- very_good_analysis - pretty good linter
- flutter_flavorizr - environment generator (dev, stage, prod ...)
For those who do not have time to read - here is a link to the repository.
The application itself is a cut version of one of our internal projects. I will leave only a few features public available. You can log in with Google. Select or create an organization. Select or create a department.
Application directory structure
lib/ ├── app.dart ├── bootstrap.dart (1) ├── config/ (2) │ ├── app_colors.dart │ ├── app_layout.dart │ ├── providers.dart (3) │ ├── router.dart (4) │ └── theme.dart ├── features/ (4) │ ├── auth/ │ ├── common/ (5) │ ├── dashboard/ │ ├── departments/ │ ├── google_sign_in/ │ └── organization/ ├── flavors.dart ├── generated_plugin_registrant.dart ├── l10n │ ├── app_en.arb │ └── app_localizations.dart ├── main_development.dart ├── main_local.dart └── main_production.dart
As we can see it is pretty simple.
A few key points to highlight:
- Initialization of services and dependencies are implemented in bootstrap.dart (1)
- The entire application configuration is located in the config(2) directory
- config/providers.dart(3) contains the main providers that must be initialized when the application is launched
Also in the body of function initializeProviders() you can add initialization of other features, with have to be initialized when the app starts. For example - authorization. So if some feature should be initialized at the beginning of the app, you do not need to hardcode it in the main or some of the top widgets. Just register its service provider into initializeProviders();
Routes and their dependencies in config/router.dart (4)
In features/ all app features.
In features/common all common resources, are used by different app features.
Let's dive deeply into implementation in the departments.
lib/features/departments/ ├── application/ │ ├── departments_create_controller.dart │ ├── departments_delete_controller.dart │ ├── departments_edit_controller.dart │ ├── departments_list_controller.dart │ └── departments_view_controller.dart ├── domain/ │ ├── entities/ │ │ ├── department_entity.dart │ │ ├── department_entity.freezed.dart │ │ └── department_entity.g.dart │ ├── failures/ │ ├── repositories/ │ │ └── department_repository_interface.dart │ └── values/ │ └── department_name.dart ├── infrastructure/ │ ├── datasources/ │ │ ├── local/ │ │ └── remote/ │ └── repositories/ │ ├── department_entity_converter.dart │ └── department_repository.dart ├── presentation/ │ ├── screens/ │ │ ├── departments_create_screen.dart │ │ ├── departments_edit_screen.dart │ │ └── departments_view_screen.dart │ └── widgets/ │ ├── department_create_form.dart │ ├── department_edit_form.dart │ └── departments_list.dart └── providers.dart
The general flow of feature creation is as follows:
- Create a directory for the feature (we use the code generator for it)
- In the domain, create entities, and validators and describe the repository interface.
- Implement repositories in the infrastructure
- Create controllers for CRUD operations
- Create providers
- Create container pages and add routes.
- Create widgets
And now let's dive into the details. Let's create a department feature.
Domain
Let's create a Department entity. It only will have a name and will have a relation to the organization.
@freezed class DepartmentEntity with _$DepartmentEntity { /// Factory constructor /// [id] - [DepartmentEntity] id /// [name] - [DepartmentEntity] name /// [createdAt] - [DepartmentEntity] create timestamp /// [organizationId] - [DepartmentEntity] organization id @JsonSerializable(fieldRename: FieldRename.snake) const factory DepartmentEntity({ @JsonKey(includeIfNull: false) String? id, @Default('') String name, @JsonKey(includeIfNull: false) String? createdAt, @JsonKey(includeIfNull: false) String? updatedAt, required String organizationId, }) = _DepartmentEntity; /// Serialization factory DepartmentEntity.fromJson(Map<String, dynamic> json) => _$DepartmentEntityFromJson(json); }
Next, let's create validators (value objects) for DepartmentEntity properties. Most likely, you will have a question about what overengineering is and what it is for.
Let's try to figure it out. Let's imagine a class form for department creation form. It contains only one field "Name". We are writing some basic validators for TextFormField. Next, after the form submits, the controller waits for the String name and the same field is waiting for the repository method. But if we will use this DepartmentName field in other forms. We will need to copy validation to other forms or extract them into files with functions (Some developers call them validators utils).
What is the guarantee that this field will be correctly validated, especially when another developer joins the project? For these purposes, in our approach, for each attribute that the user works with, we will create our own valueObject that describes the valid value of the field. And if it goes to the repository, it is 100% valid. Otherwise, the code will not execute. This way we have a collection of valueObjects for each entity. We modified the classic valueObject to automate work with forms.
Here is an example of the implementation Department Name value object.
/// Department Name value class DepartmentName extends ValueAbstract<String> { /// (1) /// factory DepartmentName(String input) { /// (2) return DepartmentName._( _validate(input), /// (3) ); } const DepartmentName._(this._value); @override Either<Failure, String> get value => _value; final Either<Failure, String> _value; } Either<Failure, String> _validate(String input) { if (input.length >= 2) { return right(input); } return left( const Failure.unprocessableEntity( message: 'The name must be at least 2 characters in length', ), ); }
Where,
1 - it extends an abstract class ValueAbstract with some type. In this case String type.
ValueAbstract gives us some additional methods for validation and data access. Take look at the code below.
abstract class ValueAbstract<T> { const ValueAbstract(); /// getter for value Either<Failure, T> get value; /// (4) @override String toString() => value.fold((l) => l.error, (r) => r.toString()); /// Form validate handler String? get validate => value.fold((l) => l.error, (r) => null); }
2 - factory method, which create object and validate it (3)
4 - getter with allows us retrieve value or failure.
And here is the TextFormFieldExample:
final department = ref.watch(departmentsEditControllerProvider(widget.id)); final errorText = department.maybeWhen( error: (error, stackTrace) => error.toString(), orElse: () => null, ); TextFormField( onChanged: (value) => _name = DepartmentName(value), decoration: InputDecoration( hintText: context.tr.departmentCreateFormFieldHintText, errorText: errorText, ), validator: (value) => _name?.validate, ),
Thus, our DepartmentName value object guarantees the validity of the data it contains.
What is Failure?
/// Represents all possible app failures class Failure implements Exception { const Failure._(); /// Expected value is null or empty const factory Failure.empty() = _EmptyFailure; /// Expected value has invalid format const factory Failure.unprocessableEntity({required String message}) = _UnprocessableEntityFailure; /// Represent 401 error const factory Failure.unauthorized() = _UnauthorizedFailure; /// Represents 400 error const factory Failure.badRequest() = _BadRequestFailure; /// Get the error message for specified failure String get error => this is _UnprocessableEntityFailure ? (this as _UnprocessableEntityFailure).message : '$this'; }
In fact, it displays all possible errors in the application. Usage example later
Where is the business logic located? Feature of business logic is located in the domain and contains value objects and repositories.
/// Departments Repository Interface abstract class DepartmentRepositoryInterface { /// (1) /// Get departments list Future<Either<Failure, List<DepartmentEntity>>> getDepartments(); /// (2) /// Get department by id Future<Either<Failure, DepartmentEntity>> getDepartmentById(String id); /// Create department Future<Either<Failure, DepartmentEntity>> createDepartment( DepartmentName name, ); /// Update department Future<Either<Failure, DepartmentEntity>> updateDepartment( String id, DepartmentName name, ); /// Delete department by id Future<Either<Failure, bool>> deleteDepartment(String id); }
A few notes:
- in our company, we agreed that we add an interface suffix to the interface name. ExampleRepositoryInterface.
- methods return failures instead of exceptions.
Infrastructure
We do not need data providers classes because Supabase provided SDK.
class DepartmentRepository implements DepartmentRepositoryInterface { /// DepartmentRepository({required this.client, required this.organization}); /// Exposes Supabase auth client to allow Auth Controller to subscribe to auth changes final supabase.SupabaseClient client; /// Authorized User entity final OrganizationEntity organization; static const String _table = 'department'; @override Future<Either<Failure, DepartmentEntity>> createDepartment( DepartmentName name, /// (1) ) async { final now = DateTimeX.current.toIso8601String(); final n = name.value.getOrElse((_) => ''); /// (2) final entity = DepartmentEntity( /// (3) name: n, createdAt: now, organizationId: organization.id!, ); final res = await client /// (4) .from(_table) .insert( entity.toJson(), ) .withConverter(DepartmentEntityConverter.toSingle) /// (5) .execute(); if (res.hasError) { /// (6) return left(const Failure.badRequest(message: res.error.toString())); } return right(res.data!); /// (7) } ....
As we can see, the method createDepartment returns Future with Failure or Entity. Important - failures are always Left.
A few notes:
- Function accepts Value Object DepartmentName, not a String departmentName
- Gets value through a getter
- Create an entity. Id can be generated by the UUID package. TBD.
- Create a record
- The peculiarity of Supabase. It always returns an array with a single entity.
- Returns Failure.badRequest
- If success returns DepartmentEntity
Every feature has its own providers.dart. It contains descriptions and initialization for all providers.
/// /// Infrastructure dependencies /// final departmentsRepositoryProvider = Provider<DepartmentRepositoryInterface>((ref) { final organization = ref.watch(currentOrganizationProvider); if (organization == null) { /// App runs on the web, we need to handle direct links throw UnimplementedError( 'OrganizationEntity was not selected', ); } return DepartmentRepository( client: ref.watch(supabaseClientProvider), /// (2) organization: organization, ); }); /// /// Application dependencies /// final departmentsListControllerProvider = StateNotifierProvider.autoDispose< DepartmentsListController, AsyncValue<List<DepartmentEntity>>>((ref) { final repo = ref.watch(departmentsRepositoryProvider); return DepartmentsListController(repo); }); final departmentsCreateControllerProvider = StateNotifierProvider.autoDispose< DepartmentsCreateController, AsyncValue<DepartmentEntity?>>((ref) { final repo = ref.watch(departmentsRepositoryProvider); return DepartmentsCreateController(repo); }); final departmentsViewControllerProvider = StateNotifierProvider.family .autoDispose<DepartmentsViewController, AsyncValue<DepartmentEntity>, String>((ref, id) { final repo = ref.watch(departmentsRepositoryProvider); return DepartmentsViewController(repo, id); }); final departmentsEditControllerProvider = StateNotifierProvider.family .autoDispose<DepartmentsEditController, AsyncValue<DepartmentEntity>, String>((ref, id) { final repo = ref.watch(departmentsRepositoryProvider); return DepartmentsEditController(repo, id); }); final departmentsDeleteControllerProvider = StateNotifierProvider.family .autoDispose<DepartmentsDeleteController, AsyncValue<bool>, String>( (ref, id) { final repo = ref.watch(departmentsRepositoryProvider); return DepartmentsDeleteController(repo, id); });
Again, the code speaks about itself. The provider's file is as a Facade. It exposes access to the feature. To communicate between features you need only import providers. Unfortunately, the family supports only 1 additional parameter. I remember that in the classic provider you can add up to 5 parameters. Therefore, if you need more, you need to create container classes. And do not forget about autoDispose!
Application
This contains our controllers for each CRUD operation respectively. We are not fans of all-in-one implementation and like to have a separate controller for each operation. Since depending on the operation, there is a different type of state.
Let's take look at the one for instance:
class DepartmentsCreateController extends StateNotifier<AsyncValue<DepartmentEntity?>> { DepartmentsCreateController(this._repository) : super(const AsyncValue.data(null)); final DepartmentRepositoryInterface _repository; /// save department Future<void> handle(DepartmentName name) async { state = const AsyncLoading(); final res = await _repository.createDepartment(name); state = res.fold((l) => AsyncValue.error(l.error), AsyncValue.data); } }
The code speaks for itself. And that's right. No one likes ponderous code. Method handle() is called after pressing the save button in the form. Maybe you may ask what is AsyncValue! It is a utility for safely manipulating asynchronous data. By using [AsyncValue], you are guaranteed that you cannot forget to handle the loading/error state of an asynchronous operation. It also exposes some utilities to nicely convert a [AsyncValue] to a different object. For example, a Flutter Widget may use [when] to convert an [AsyncValue] into either a progress indicator, an error screen, or to show the data:
/// A provider that asynchronously exposes the current user final userProvider = StreamProvider<User>((_) async* { // fetch the user }); class Example extends ConsumerWidget { @override Widget build(BuildContext context, WidgetRef ref) { final AsyncValue<User> user = ref.watch(userProvider); return user.when( loading: () => CircularProgressIndicator(), error: (error, stack) => Text('Oops, something unexpected happened'), data: (value) => Text('Hello ${user.name}'), ); } }
Quite a convenient utility. Using the controller + AsyncValue pair, you can quickly generate smart widgets. But it is very lacking AsyncValue.initial().
Presentation
The same form for creating a department.
class DepartmentCreateForm extends ConsumerStatefulWidget { const DepartmentCreateForm({super.key}); @override ConsumerState<ConsumerStatefulWidget> createState() => _DepartmentCreateFormState(); } class _DepartmentCreateFormState extends ConsumerState<DepartmentCreateForm> { final _formKey = GlobalKey<FormState>(); DepartmentName? _name; @override Widget build(BuildContext context) { ref.listen<AsyncValue<DepartmentEntity?>>( /// (1) departmentsCreateControllerProvider, (previous, next) { next.maybeWhen( data: (data) { if (data == null) return; ref .read(departmentsListControllerProvider.notifier) .addDepartment(data); context.pop(); }, orElse: () {}, ); }); final res = ref.watch(departmentsCreateControllerProvider); /// (2) final errorText = res.maybeWhen( /// (3) error: (error, stackTrace) => error.toString(), orElse: () => null, ); final isLoading = res.maybeWhen( /// (4) data: (_) => res.isRefreshing, loading: () => true, orElse: () => false, ); return Form( key: _formKey, autovalidateMode: AutovalidateMode.onUserInteraction, child: Padding( padding: const EdgeInsets.all(8), child: Column( mainAxisSize: MainAxisSize.min, children: [ TextFormField( onChanged: (value) => _name = DepartmentName(value), /// (5) decoration: InputDecoration( hintText: context.tr.departmentCreateFormFieldHintText, errorText: errorText, ), validator: (value) => _name?.validate, /// (6) readOnly: isLoading, ), const SizedBox( height: AppLayout.defaultPadding, ), ElevatedButton( onPressed: isLoading ? null : () { if (!_formKey.currentState!.validate()) { return; } if (_name == null) return; /// (7) ref .read(departmentsCreateControllerProvider.notifier) .handle(_name!); /// (8) }, child: isLoading ? const CircularProgressIndicator() : Text(context.tr.departmentCreateBtn), ), ], ), ), ); } }
Where,
- Subscribe for changes in the provider. If the save is successful, we update the list of departments and go back. By the way, the go router does not support context.pop(result);
- Listen for changes in the provider
- Highlight the field if an error arrives from the infrastructure. error.toString() === ValueAbstract.toString()
- We block changes and clicks when a request is made
- Update the valueObject
- ValueAbstract.validate()
- If the field is not filled - do nothing
- Call the repo
Conclusions
Onion architecture is a guarantee that when your application grows, it will remain readable and maintainable. It looks complicated. Until you simply figure it out or someone smart explains principles to you. Is this architecture suitable for all projects? Perhaps. You can partially simplify the feature structure. Yes, you can trigger API requests from widgets - but this is not about us.
In the GitHub repository, you will find a working prototype. If you want to see a more finalized version - star the repo, so we will know that it is interesting to someone and that it is worth sharing our knowledge further.
